Why You’ll Love This Berry Cake
- Beautifully Layered – The combination of vanilla cake, crème pâtissière, and fruit filling creates an eye-catching slice.
- Perfectly Balanced Flavors – The sweetness of the cream and the tartness of the berries make each bite irresistible.
- Great for Any Occasion – A cake this elegant works well for birthdays, dinner parties, or holiday gatherings.
- Make-Ahead Tips – Learn how to prepare the layers in advance for easy assembly.
Berries not only add natural sweetness but also bring vibrant color and freshness, making this cake stand out. Whether you’re impressing guests or treating yourself, this berry cake is a must-try.
How to Make the Perfect Berry Cake
Follow the detailed instructions below to create this Berry Cake with Crème Pâtissière and Forest Fruit Filling with confidence. You’ll also find expert tips on assembling layers, achieving the perfect buttercream texture, and decorating with fresh berries.
If you love experimenting with flavors, you might also enjoy trying my Easy Chocolate Cake Recipe – Moist, Delicious, And Perfect For Guests. It’s a simple yet indulgent chocolate treat that pairs perfectly with this berry cake for any dessert table!
Ready to bake? Let’s make this irresistible cake a reality! Don’t forget to follow me on Instagram and Facebook for more updates and content.

Berry Bliss Dream Cake
Ingredients
Cake Ingredients
- 375 g all-purpose flour
- 600 g granulated sugar
- 10 g baking powder
- 6 g fine salt
- 225 g unsalted butter at room temp
- 240 g egg whites about 7 egg whites from medium-sized eggs, at room temperature
- 360 ml buttermilk at room temperature
- 30 g 2 tbsp vegetable oil
- 10 ml 2 tsp vanilla extract
Crème Pâtissière Ingredients
- 5 egg yolks medium eggs
- 225 g granulated sugar
- 835 ml full fat milk
- 85 g corn flour
- 1 vanilla bean
- 85 g butter
Forest Fruit Filling
- 500 g forest fruit frozen unpitted
- 110 g granulated sugar
- 40 g corn starch
- 250 ml water
- 30 ml 2 tbsp of lemon juice
Italian Buttercream
- 360 g granulated sugar
- 170 ml water
- 180 g 6 medium egg whites
- 1 g cream of tartar or 1/2 tsp of lemon juice
- 455 g unsalted butter room temperature
- 7 g vanilla extract
- 2 g fine salt
Instructions
For the Vanilla Cake
- Preheat your oven to 180°C (350F). Line four 18 cm or three 20 cm pans with parchment paper and grease with non-stick spray.
- In a stand mixer or with a hand mixer, combine the flour, sugar, baking powder and salt. Mix until fully combined.
- Gradually add the butter to the dry ingredients while mixing on low speed. Continue mixing until the butter is fully incorporated, and the mixture resembles coarse, moist sand.
- Slowly mix in the egg whites until just combined. Then, add the buttermilk in two parts, mixing on low speed after each addition.
- Add the vegetable oil and vanilla extract, mixing on low speed until fully combined.
- Scrape down the sides of the bowl with a spatula, then mix on medium speed for about a minute to ensure the batter is smooth and the texture is light.
- Evenly divide the batter between your prepared pans. Use a kitchen scale to ensure each pan has the same amount for even baking. In my case, I made 3 pans (20 cm each) and added about 600 grams of batter to each pan.
- Bake for 33–35 minutes, or until a toothpick inserted into the center comes out with a few moist crumbs.
- Allow the cakes to cool for 10 minutes and remove from the pans.
- Use a serrated knife to level the tops of the layers when you’re ready to assemble your cake. To create my five-layer cake, I sliced each cake horizontally into two even layers.
For the Creme patisserie filling
- In a bowl add the yolks, half of the sugar, and whisk well.
- Add 100 g of the milk, the cornstarch, and whisk.
- In a pot add the rest of the milk, the rest of the sugar, the vanilla seeds and pod, and transfer over medium heat.
- As soon as the mixture starts boiling, remove from the heat, discard the vanilla pod, and slowly pour it into the bowl with the yolks, by whisking constantly.
- Transfer into the pot again and place it over medium heat. Whisk until the cream thickens well.
- Remove from the heat and add the butter. Stir until the butter melts.
- Transfer into a bowl, cover with plastic wrap, and refrigerate for 3-4 hours to cool well. The plastic wrap should touch the surface of the cream.
- Remove from the refrigerator, and whisk well or beat it in the mixer for a few seconds, until fluffy.
For the Forest fruit filling
- In a saucepan add the fruit, water, sugar, cornstarch and lemon juice.
- Bring to a boil and stir.
- Stirring constantly reduce heat and allow to cook until filling is thickened. (just for a few minutes).
- Transfer into a bowl, cover with plastic wrap, and refrigerate for 3-4 hours to cool well. The plastic wrap should touch the surface of the cream.
- Remove from the refrigerator, and stir well.
For the Italian Buttercream
- Combine the sugar and water in a medium pot and stir over medium heat until the sugar dissolves. Once the mixture starts to boil, stop stirring and attach a thermometer to the pot. Cook the syrup until it reaches 115°C (240°F).
- Separate the egg whites one by one in a separate bowl, then transfer them into the mixing bowl. If any yolk touches the egg whites, discard the egg and thoroughly wash the bowl before starting with a new egg. It’s crucial to keep the egg whites free from fats. To ensure the bowl is spotless, I like to wipe it with vinegar to remove any potential fat residue.
- Add cream of tartar or lemon juice to the egg whites and attach the whisk to the mixer.
- When the sugar reaches 110°C (230°F), begin whipping the egg whites on medium-high speed. The goal is to reach soft peaks by the time the syrup hits 115°C (240°F).
- With the mixer running, slowly pour the hot sugar syrup into the egg whites in a steady stream. Continue whipping on high speed until stiff peaks form and the bowl feels cool to the touch. The meringue should be smooth and glossy, not clumpy or dry.
- With the mixer still running, gradually add room-temperature butter in small chunks. Keep mixing until all the butter is incorporated, and the buttercream becomes light and smooth.
- If the buttercream looks runny at the end of this process, chill the bowl in the refrigerator for a few minutes, then whip it again until the desired consistency is reached.
Assembly Time
- After all this hard work, it is about time to have fun and put together this awesome cake
- Once your cake has cooled and the fillings have chilled, it’s time to assemble your layers. While you could stick to a classic three-layer cake, dividing each cake into two layers creates an amazing alternation between the crème pâtissière, cake, and fruit filling. Each bite brings together the creamy richness of the crème pâtissière, the soft texture of the cake, and the bright, fresh burst of the fruit filling. This extra layering not only makes the cake look visually stunning but ensures that every slice is a perfect balance of flavors and textures.
- To cut each layer into two pieces, place the cake on a turnable table, keep your arm close to your body and with your other hand steadily turn the table by applying light stable pressure to the knife. Once you have evenly sliced your layers you are ready to proceed to the next step.
- Place your first cake layer on a cake stand, or platter. Pipe a ring of buttercream frosting around the outer edge of the cake layer as shown in the picture. Fill in the gap in the ring with crème pâtissière.
- Add the next cake layer to the top and create another ring of buttercream around the cake perimeter.
- Make sure to use a small spatula and seal the buttercream to the cake. This step ensures that no fruit filling spills out.
- Repeat the previous steps until you have used all your cake ( I deliberately left out one cake layer as I wanted to have two separate layers of each filling.
- Once the cake is stacked, place your hands around the cake and push in place any layers that are not straight.
- Apply a thin layer of buttercream around the cake to coat any cake crumbs.
- Refrigerate for a couple of hours so that the butter in the buttercream stiffens and the cake gains some structure.
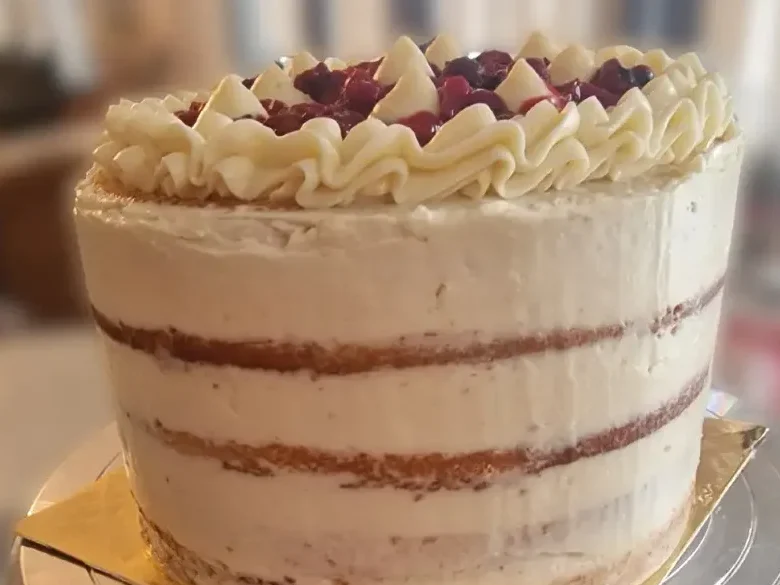
- Once the cake has chilled it is now ready for the final buttercream coating and decorations. In my case, I decided to go with a half-naked cake. I added some dollops of crème pâtissière on the top and filled the gaps with the fruit filling.
Notes
Stack tour layers – alternate fillings
Make sure to create a ring of buttercream to prevent the fillings from leaking out. Press part of the buttercream on the cake to ensure it will not leak as more weight is added on top.
Add your filling up to the buttercream ring.
For the filling not to leak, make sure to add no more that the eight of the buttercream ring.
Semi-nakes design
I decided to make my cake semi-naked as I didn;t want the buttercream to stand out. I wanted all the other elements to stand out.


